Fork me on GitHub
每天进步一小点

一切就是这么简单


  • 首页

  • 关于

  • 标签

  • 分类

  • 归档

jvm内存区域解读

发表于 2018-06-22 | 更新于 2019-04-20 | 分类于 jvm

前言

  • Java虚拟机在运行时,会把内存空间分为若干个区域,根据《Java虚拟机规范(Java SE 7 版)》的规定,
    Java虚拟机所管理的内存区域分为如下部分:方法区、堆内存、虚拟机栈、本地方法栈、程序计数器
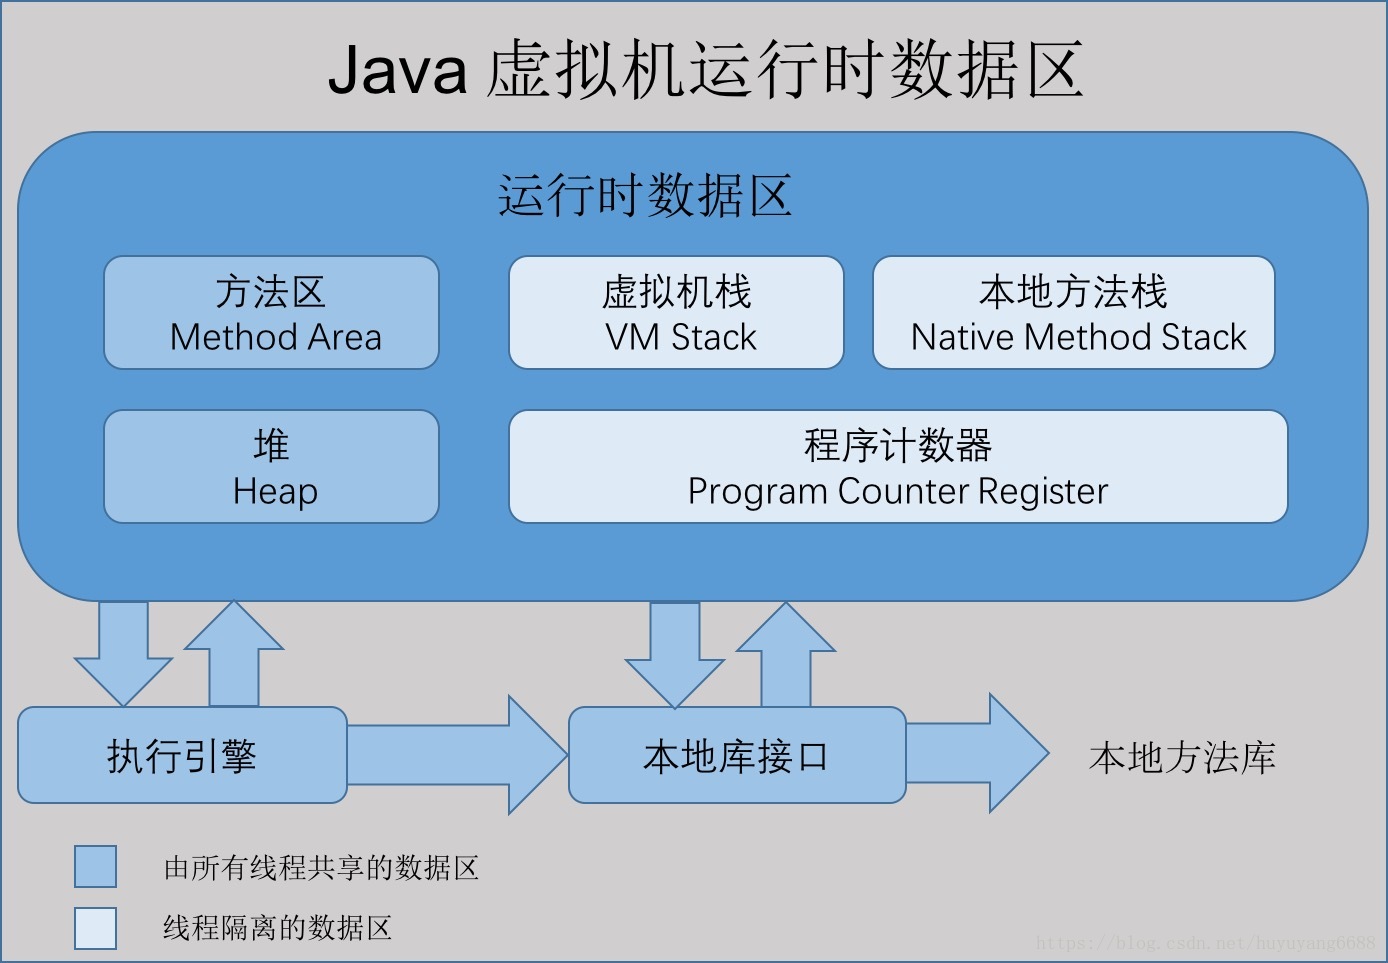
    jvmMemoryArea

方法区

  • 方法区主要用于存储虚拟机加载的类信息、常量、静态变量、以及编译器编译后的代码等数据。在JDK1.7及其之前,
    方法区是堆的一个”逻辑部分”(一片连续的堆空间),但为了与堆做区分,方法区还有个名字叫“非堆”,也有人用“永久代”(HotSpot对方法区的实现方法)来表示方法区。

  • 从jdk1.7已经开始准备“去永久代”的规划,jdk1.7的HotSpot中,已经把原本放在方法区中的静态变量、字符串常量池等移到堆内存中,常量池除字符串常量池还有class常量池等),
    这里只是把字符串常量池移到堆内存中;在jdk1.8中,方法区已经不存在,原方法区中存储的类信息、编译后的代码数据等已经移动到了元空间(MetaSpace)中,元空间并没有处于堆内存上,而是直接占用的本地内存(NativeMemory)。
    根据网上的资料结合自己的理解对jdk1.3~1.6、jdk1.7、jdk1.8中方法区的变迁画了张图如下(如有不合理的地方希望读者指出):

    jdk

  • 去永久代的原因有:

    • 字符串存在永久代中,容易出现性能问题和内存溢出。
    • 类及方法的信息等比较难确定其大小,因此对于永久代的大小指定比较困难,太小容易出现永久代溢出,太大则容易导致老年代溢出。
    • 永久代会为 GC 带来不必要的复杂度,并且回收效率偏低。

堆内存

  • 堆内存主要用于存放对象和数组,它是JVM管理的内存中最大的一块区域,堆内存和方法区都被所有线程共享,在虚拟机启动时创建。
    在垃圾收集的层面上来看,由于现在收集器基本上都采用分代收集算法,因此堆还可以分为新生代(YoungGeneration)和老年代(OldGeneration),新生代还可以分为 Eden、From Survivor、To Survivor

程序计数器

  • 程序计数器是一块非常小的内存空间,可以看做是当前线程执行字节码的行号指示器,每个线程都有一个独立的程序计数器,
    因此程序计数器是线程私有的一块空间,此外,程序计数器是Java虚拟机规定的唯一不会发生内存溢出的区域

虚拟机栈

  • 虚拟机栈也是每个线程私有的一块内存空间,它描述的是方法的内存模型,直接看下图所示:
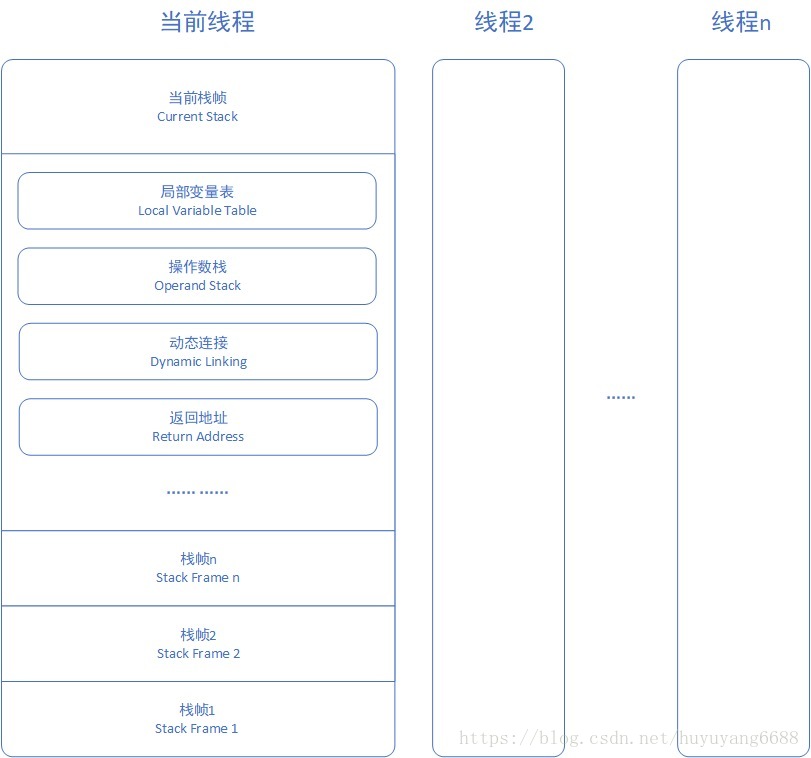
    jvmStack
  • 虚拟机会为每个线程分配一个虚拟机栈,每个虚拟机栈中都有若干个栈帧,每个栈帧中存储了局部变量表、操作数栈、动态链接、返回地址等。
    一个栈帧就对应 Java 代码中的一个方法,当线程执行到一个方法时,就代表这个方法对应的栈帧已经进入虚拟机栈并且处于栈顶的位置,
    每一个 Java 方法从被调用到执行结束,就对应了一个栈帧从入栈到出栈的过程

本地方法栈

  • 本地方法栈与虚拟机栈的区别是,虚拟机栈执行的是 Java 方法,本地方法栈执行的是本地方法(Native Method)
    其他基本上一致,在 HotSpot 中直接把本地方法栈和虚拟机栈合二为一,这里暂时不做过多叙述

元空间

  • 上面说到,jdk1.8 中,已经不存在永久代(方法区),替代它的一块空间叫做 “ 元空间 ”,和永久代类似,
    都是 JVM 规范对方法区的实现,但是元空间并不在虚拟机中,而是使用本地内存,元空间的大小仅受本地内存限制,
    但可以通过 -XX:MetaspaceSize 和 -XX:MaxMetaspaceSize 来指定元空间的大小

总结

jvm

nginx整理

发表于 2018-06-12 | 更新于 2019-04-20 | 分类于 nginx

内置预定义变量

  • $args:这个变量等于GET请求中的参数。例如foo=123&bar=456,这个变量只能被修改
  • $host:请求中的主机头(HOST)字段,如果请求中的主机头不可用或者空,则为处理请求的server名称(处理请求的server的server_name指令的值)。值为小写,不包含端口
  • $remote_addr:客户端的IP地址
  • $remote_port:客户端的端口
  • $request_uri:这个变量等于包含一些客户端请求参数的原始URI,它无法修改,请查看$uri更改或重写URI
  • $scheme:所用的协议,比如http或者是https,比如rewrite ^(.+)$ $scheme://example.com$1 redirect;
  • $server_addr:服务器地址,在完成一次系统调用后可以确定这个值,如果要绕开系统调用,则必须在listen中指定地址并且使用bind参数
  • $server_name:服务器名称
  • $server_port:请求到达服务器的端口号
  • $server_protocol:请求使用的协议,通常是HTTP/1.0或HTTP/1.1
  • $uri:请求中的当前URI(不带请求参数,参数位于$args),不同于浏览器传递的$request_uri的值,它可以通过内部重定向,或者使用index指令进行修改。不包含协议和主机名,例如/foo/bar.html
阅读全文 »

nginx安装

发表于 2018-06-11 | 更新于 2019-04-20 | 分类于 nginx

官网下载 nginx

  • 1 下载 Nginx,下载地址:http://nginx.org/download/nginx-1.6.2.tar.gz,并上传到服务器,或直接使用wget

安装 nginx

  • 1 解压安装包
    1
    tar zxvf nginx-1.6.2.tar.gz
  • 2 进入解压目录

    1
    cd nginx-1.6.2
  • 3 编译安装

    1
    2
    3
    4
    5
    6
    7
    命令:
    ./configure --prefix=/usr/local/nginx
    make && make install
    错误:./configure: error: the HTTP rewrite module requires the PCRE library.如果出现以上错误
    解决如下:
    yum -y install pcre-devel openssl openssl-devel
    然后重新执行上一步命令

安装完成

  • 1 查看版本

    1
    /usr/local/nginx/sbin/nginx -v
  • 2 启动Nginx

    1
    /usr/local//nginx/sbin/nginx
  • 3 Nginx其他命令

    /usr/local/nginx/sbin/nginx -s reload            # 重新载入配置文件
    /usr/local/nginx/sbin/nginx -s reopen            # 重启 Nginx
    /usr/local/nginx/sbin/nginx -s stop              # 停止 Nginx
    

    访问Nginx

  • 1 阿里云服务器默认80端口关闭,需要在控制台管理界面,左侧菜单 安全组–>配置规则,添加80/80端口。即可访问

EnableAutoConfiguration实战与原理

发表于 2018-06-05 | 更新于 2019-04-19 | 分类于 spring boot
  • 在 SpringBoot 项目中集成其他框架是非常简单的,如果需要添加 WebMvc,只需要引入对应的依赖

    1
    2
    3
    4
    <dependency>
    <groupId>org.springframework.boot</groupId>
    <artifactId>spring-boot-starter-web</artifactId>
    </dependency>
  • 就可以了,这样就轻轻松松的把 WebMVC 给整合进来了,是不是超简单。就连 @EnableXX 注解都不需要,那是为什么呢?是时候来剖析其中的原理了。
    SpringBoot 项目中通常是添加注解 @SpringBootApplication,这个注解集成了常用的几个注解:

    1
    @SpringBootConfiguration,@EnableAutoConfiguration,@ComponentScan
  • 如果只是单纯的启动 SpringBoot 项目的话,只需要添加 @SpringBootConfiguration 注解就可以了。这样项目是虽然可以正常启动与使用,但是就失去了 SpringBoot 给我们带来的便利性。SpringBoot 整合其他框架通常会有各种 AutoConfiguration,但是必须得添加 @EnableAutoConfiguration 注解才可以使用。这里来解析下:
    在 SpringBoot 官方文档中,特别说明了 META-INF/spring.factories 目录的使用:

    1
    2
    3
    4
    5
    6
    7
    8
    9
    10
    11
    12
    13
    14
    43.1 Understanding auto-configured beans
    Under the hood, auto-configuration is implemented with standard @Configuration classes. Additional @Conditional annotations are used to constrain when the auto-configuration should apply. Usually auto-configuration classes use @ConditionalOnClass and @ConditionalOnMissingBean annotations. This ensures that auto-configuration only applies when relevant classes are found and when you have not declared your own @Configuration.

    You can browse the source code of spring-boot-autoconfigure to see the @Configuration classes that we provide (see the META-INF/spring.factories file).

    43.2 Locating auto-configuration candidates
    Spring Boot checks for the presence of a META-INF/spring.factories file within your published jar. The file should list your configuration classes under the EnableAutoConfiguration key.

    org.springframework.boot.autoconfigure.EnableAutoConfiguration=\
    com.mycorp.libx.autoconfigure.LibXAutoConfiguration,\
    com.mycorp.libx.autoconfigure.LibXWebAutoConfiguration
    You can use the @AutoConfigureAfter or @AutoConfigureBefore annotations if your configuration needs to be applied in a specific order. For example, if you provide web-specific configuration, your class may need to be applied after WebMvcAutoConfiguration.

    If you want to order certain auto-configurations that shouldn’t have any direct knowledge of each other, you can also use @AutoconfigureOrder. That annotation has the same semantic as the regular @Order annotation but provides a dedicated order for auto-configuration classes.
  • 大致意思是说 SpringBoot 会自动解析所有 jar 中的 META-INF/spring.factories 文件。其中大部分自动配置文件都放在了 spring-boot-autoconfigure 的 jar 中,可以根据自己的需要去看看。
    如果需要指定自动配置类的顺序,可以使用 @AutoConfigureAfter @AutoConfigureBefore、@AutoconfigureOrder 进行设置顺序。

    那么来解析下 @EnableAutoConfiguration 注解做了什么。

源码分析

  • @EnableAutoConfiguration代码

    1
    2
    3
    4
    5
    6
    7
    8
    9
    10
    11
    12
    @SuppressWarnings("deprecation")
    @Target(ElementType.TYPE)
    @Retention(RetentionPolicy.RUNTIME)
    @Documented
    @Inherited
    @AutoConfigurationPackage
    @Import(EnableAutoConfigurationImportSelector.class)
    public @interface EnableAutoConfiguration {

    String ENABLED_OVERRIDE_PROPERTY = "spring.boot.enableautoconfiguration";
    //略。。。
    }
  • 发现这里使用了 @Import 注解,导入 EnableAutoConfigurationImportSelector 类。

    @Import 可以将对应的 Bean 导入到 Spring 上下文中。如果类在工程中的话那么直接使用 @Configuration 注解即可,Spring 会自动识别的。但是如果在其他 jar 包或框架上,没有配置到自动扫描的目录中或者是没有添加 @Configuration 注解,那么就需要使用 @Import 将其导入到项目中来。

    EnableAutoConfigurationImportSelector 继承了 AutoConfigurationImportSelector,实现了 isEnable 方法,当配置文件中配置 spring.boot.enableautoconfiguration=false 的时候,@EnableAutoConfiguration 功能为关闭状态,不进行其他自动逻辑处理。也就是所有的 EnableXX 框架都不能自动配置启动了。

    ImportSelector 核心作用就是:将方法 selectImports 中返回的类数组导入到 Spring 上下文中。

    AutoConfigurationImportSelector 间接的实现了 ImportSelector 接口,且实现为:

    1
    2
    3
    4
    5
    6
    7
    8
    9
    10
    11
    12
    13
    14
    15
    16
    17
    18
    19
    20
    21
    22
    23
    24
    25
    @Override
    public String[] selectImports(AnnotationMetadata annotationMetadata) {
    //配置spring.boot.enableautoconfiguration=false的时候不导入任何bean
    if (!isEnabled(annotationMetadata)) {
    return NO_IMPORTS;
    }
    try {
    AutoConfigurationMetadata autoConfigurationMetadata = AutoConfigurationMetadataLoader
    .loadMetadata(this.beanClassLoader);
    AnnotationAttributes attributes = getAttributes(annotationMetadata);
    List<String> configurations = getCandidateConfigurations(annotationMetadata,
    attributes);
    configurations = removeDuplicates(configurations);
    configurations = sort(configurations, autoConfigurationMetadata);
    Set<String> exclusions = getExclusions(annotationMetadata, attributes);
    checkExcludedClasses(configurations, exclusions);
    configurations.removeAll(exclusions);
    configurations = filter(configurations, autoConfigurationMetadata);
    fireAutoConfigurationImportEvents(configurations, exclusions);
    return configurations.toArray(new String[configurations.size()]);
    }
    catch (IOException ex) {
    throw new IllegalStateException(ex);
    }
    }
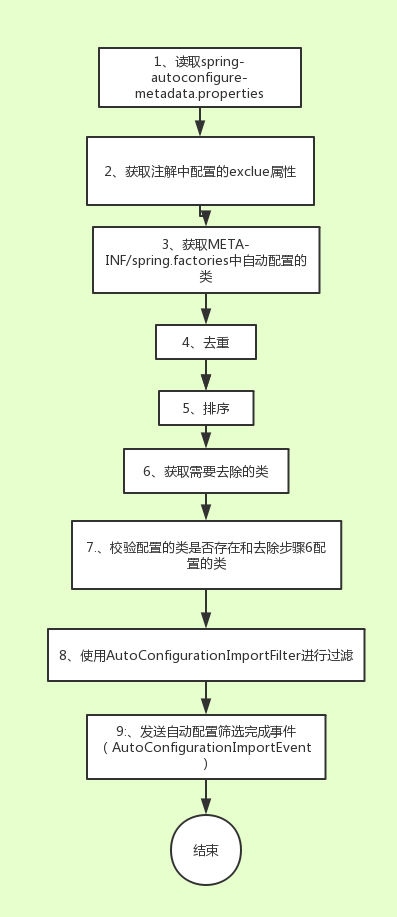
  • 以上这部分代码就是自动配置的核心了,下面对以上的代码进行逐步分析:
    AutoConfigurationMetadata autoConfigurationMetadata = AutoConfigurationMetadataLoader .loadMetadata(this.beanClassLoader);

  • 这里读取了 META-INF/spring-autoconfigure-metadata.properties 配置文件,这个配置文件中配置了 SpringBoot 自动集成的各种 Enable 框架的执行条件,比如定义与其他 AutoConfiguration 框架的执行顺序,
    需要哪些 Bean 在的时候才可以执行等。这里的功能就等价于 @AutoConfigureAfter @AutoConfigureBefore 注解的功能。
    下面截取部分配置,感兴趣的可以到 spring-boot-autoconfig- 版本号 /META-INF/spring-autoconfigure-metadata.properties 文件中查看

    EnableAutoConfiguration

  • 这里读取 META-INF/spring.factories 配置文件中对应 key:org.springframework.boot.autoconfigure.EnableAutoConfiguration 所对应的类。
    源码如下:

    1
    2
    3
    4
    5
    6
    7
    8
    9
    protected List<String> getCandidateConfigurations(AnnotationMetadata metadata,
    AnnotationAttributes attributes) {
    List<String> configurations = SpringFactoriesLoader.loadFactoryNames(
    getSpringFactoriesLoaderFactoryClass(), getBeanClassLoader());
    Assert.notEmpty(configurations,
    "No auto configuration classes found in META-INF/spring.factories. If you "
    + "are using a custom packaging, make sure that file is correct.");
    return configurations;
    }

    SpringFactoriesLoader.loadFactoryNames 方法中主要是加载 META-INF/spring.factories 文件,并且获取 key 为 EnableAutoConfiguration 类全名对应的属性值。感兴趣的可以继续跟入看看源码。

    AnnotationAttributes attributes = getAttributes(annotationMetadata);
    这里读取 @EnableAutoConfiguration 注解中配置的 exclude,excludeName 两个属性值。

    configurations = removeDuplicates(configurations);
    去除重复的引用,这里实现相当的简单,先将 list 转换有序的 set 对象,这样的话重复的类就被自动剔除了,然后再将 set 转换成 list。

    configurations = sort(configurations, autoConfigurationMetadata);
    顾名思义,这里是对所有的自动配置 Bean 进行排序,使用的规则就是在上面获取到的配置文件的 autoConfigurationMetadata。

  • sort 的实现为:

    1
    2
    3
    4
    5
    6
      private List<String> sort(List<String> configurations,
    AutoConfigurationMetadata autoConfigurationMetadata) throws IOException {
    configurations = new AutoConfigurationSorter(getMetadataReaderFactory(),
    autoConfigurationMetadata).getInPriorityOrder(configurations);
    return configurations;
    }
  • 实际的排序功能是在 getInPriorityOrder 中:

    1
    2
    3
    4
    5
    6
    7
    8
    9
    10
    11
    12
    13
    14
    15
    16
    17
    18
    19
    20
    21
    public List<String> getInPriorityOrder(Collection<String> classNames) {
    final AutoConfigurationClasses classes = new AutoConfigurationClasses(
    this.metadataReaderFactory, this.autoConfigurationMetadata, classNames);
    List<String> orderedClassNames = new ArrayList<String>(classNames);
    // Initially sort alphabetically
    Collections.sort(orderedClassNames);
    // Then sort by order
    Collections.sort(orderedClassNames, new Comparator<String>() {

    @Override
    public int compare(String o1, String o2) {
    int i1 = classes.get(o1).getOrder();
    int i2 = classes.get(o2).getOrder();
    return (i1 < i2) ? -1 : (i1 > i2) ? 1 : 0;
    }

    });
    // Then respect @AutoConfigureBefore @AutoConfigureAfter
    orderedClassNames = sortByAnnotation(classes, orderedClassNames);
    return orderedClassNames;
    }

    这里的实现还是比较清晰的,先通过类名自然排序,然后根据 Bean 配置的 Order 排序 (@AutoConfigureOrder 或在配置文件中指定),最后根据 @AutoConfigureBefore @AutoConfigureAfter 注解中配置(配置文件中指定)的顺序关系进行排序。通过以上步骤,就将所有 AutoConfiguration 的顺序指定 ok 了。

    Set exclusions = getExclusions(annotationMetadata, attributes);
    获取 EnableAutoConfiguration 注解中配置的 exclude,excludeName 与配置中配置的 spring.autoconfigure.exclude 对应的类。

    checkExcludedClasses(configurations, exclusions); configurations.removeAll(exclusions);
    先对之前步骤获取到的需要剔除的类进行是否存在校验,如果在所有的 AutoConfiguration(configurations)中都不包含配置的类的话,那么说明配置有问题,直接抛出异常。如果都存在的话,那么从 configurations 去除需要排除的类。

    configurations = filter(configurations, autoConfigurationMetadata);
    进行数据过滤。这里会获取系统中所有的 AutoConfigurationImportFilter 对象,通过循环调用 AutoConfigurationImportFilter.match 方法筛选出不符合条件的 AutoConfiguration 类。这样流程过后剩下的 AutoConfiguration 类就是符合我们系统的要求了。

    fireAutoConfigurationImportEvents(configurations, exclusions);
    发送自动配置筛选完成事件(AutoConfigurationImportEvent),将筛选后的结果通知对应的(实现了 AutoConfigurationImportListener)的监听者,进行对应的操作。

    通过以上步骤后,就筛选出了符合需要的自动配置的类。针对以上步骤整理出的流程图如下:

    EnableAutoConfigurationFlow

总结

  • @EnableAutoConfiguration 会自动将工程中 META-INF/spring.factories 配置文件中 key 为 org.springframework.boot.autoconfigure.EnableAutoConfiguration 对应的所有类进行自动导入。
    这也就是为什么 @EnableAutoConfiguration 是 SpringBoot 项目的标配注解了,如果没有导入这个注解所实现的功能,那么所有的自动配置功能将无法使用,也就失去了 SpringBoot 的方便性了。
    如果需要配置自动配置类的加载顺序,可以在 META-INF/spring-autoconfigure-metadata.properties 进行配置。这里就可以解释为什么有的框架直接引入对应的 jar 就可以自动运行的原因(如 Web)。

实战

  • 有两个自动配置类 TestConfiguration,TestConfiguration2 代码基本一样。只在构造方法中打印出实例化后的类名和 init 信息,如下:

    1
    2
    3
    4
    5
    6
    public class TestConfiguration {
    private static Logger log = LoggerFactory.getLogger(TestConfiguration.class);

    public TestConfiguration() {
    log.info("=========>TestConfiguration init!!!");
    }
  • 然后将这两个类配置到工程中的 META-INF/spring.factories 文件中:

    1
    2
    org.springframework.boot.autoconfigure.EnableAutoConfiguration=\
    com.cml.chat.lesson.lesson5.TestConfiguration,com.cml.chat.lesson.lesson5.TestConfiguration2
  • 默认 Bean 的加载是按照类名的自然排序进行的,项目启动后输入的 log 为:

    1
    2
    com.cml.chat.lesson.lesson5.TestConfiguration - =========>TestConfiguration init!!!
    com.cml.chat.lesson.lesson5.TestConfiguration2 - =========>TestConfiguration2 init!!!
  • 此时如果想要 TestConfiguration2 优先于 TestConfiguration 执行,比如 TestConfiguration 需要依赖 TestConfiguration2 做的操作。
    那么这时候就可以在 META-INF/spring-autoconfigure-metadata.properties 添加配置:

    1
    2
    3
    4
    #order config
    com.cml.chat.lesson.lesson5.TestConfiguration=
    com.cml.chat.lesson.lesson5.TestConfiguration2=
    com.cml.chat.lesson.lesson5.TestConfiguration.AutoConfigureAfter=com.cml.chat.lesson.lesson5.TestConfiguration2
  • 项目启动后输入 log:

    1
    2
    com.cml.chat.lesson.lesson5.TestConfiguration2 - =========>TestConfiguration2 init!!!
    com.cml.chat.lesson.lesson5.TestConfiguration - =========>TestConfiguration init!!!
  • TestConfiguration 在 TestConfiguration2 初始化之后了,这里可以完成注解对应的顺序功能和条件限制功能。

ConfigurationProperties实战与原理

发表于 2018-06-03 | 更新于 2019-04-19 | 分类于 spring boot

前言

  • 在 SpringBoot 中,当想需要获取到配置文件数据时,除了可以用 Spring 自带的 @Value 注解外,
    SpringBoot 还提供了一种更加方便的方式:@ConfigurationProperties。只要在 Bean 上添加上了这个注解,
    指定好配置文件的前缀,那么对应的配置文件数据就会自动填充到 Bean 中。举个例子,现在有如下配置:

    1
    2
    3
    myconfig.name=test
    myconfig.age=22
    myconfig.desc=这是我的测试描述
  • 添加对应的配置类,并添加上注解 @ConfigurationProperties,指定前缀为 myconfig:

    1
    2
    3
    4
    5
    6
    7
    8
    9
    10
    11
    12
    @Component
    @ConfigurationProperties(prefix = "myconfig")
    public class MyConfig {
    private String name;
    private Integer age;
    private String desc;
    //get/set 略
    @Override
    public String toString() {
    return "MyConfig [name=" + name + ", age=" + age + ", desc=" + desc + "]";
    }
    }
  • 测试并使用

    1
    2
    3
    4
    5
    6
    7
    8
    9
    10
    11
    12
    13
    14
    public static void main(String[] args) throws Exception {
    SpringApplication springApplication = new SpringApplication(Application.class);
    // 非web环境
    springApplication.setWebEnvironment(false);
    ConfigurableApplicationContext application = springApplication.run(args);

    MyConfig config = application.getBean(MyConfig.class);
    log.info(config.toString());
    application.close();
    }

    可以看到输出 log:

    com.cml.chat.lesson.lesson3.Application - MyConfig [name=test, age=22, desc=这是我的测试描述]

    -

    原理分析

  • 首先进入 @ConfigurationProperties 源码中,可以看到如下注释提示:
    ConfigurationProperties

  • See Also 中给我们推荐了 ConfigurationPropertiesBindingPostProcessor 和 EnableConfigurationProperties 两个类,EnableConfigurationProperties 先放到一边,
    因为后面的文章中会详解 EnableXX 框架的实现原理,这里就先略过。那么重点来看看 ConfigurationPropertiesBindingPostProcessor,光看类名是不是很亲切?
    不知上篇文章中讲的 BeanPostProcessor 是否还有印象,没有的话赶紧回头看看哦

  • ConfigurationPropertiesBindingPostProcessor

    • 一看就知道和 BeanPostProcessor 有扯不开的关系,进入源码可以看到,该类实现的 BeanPostProcessor 和其他多个接口

      1
      2
      3
      public class ConfigurationPropertiesBindingPostProcessor implements BeanPostProcessor,
      BeanFactoryAware, EnvironmentAware, ApplicationContextAware, InitializingBean,
      DisposableBean, ApplicationListener<ContextRefreshedEvent>, PriorityOrdered
    • 这里是不是非常直观,只看类的继承关系就可以猜出大概这个类做了什么。BeanFactoryAware、EnvironmentAware、ApplicationContextAware 是 Spring 提供的获取 Spring 上下文中指定对象的方法而且优先于 BeanPostProcessor 调用,至于如何工作的后面的文章会进行详解,这里只要先了解一下作用就可以了。

      此类同样实现了 InitializingBean 接口,从上篇文章中已经知道了 InitializingBean 是在 BeanPostProcessor.postProcessBeforeInitialization 之后调用,那么 postProcessBeforeInitialization 目前就是我们需要关注的重要入口方法

源码分析:

先看看源码:

1
2
3
4
5
6
7
8
9
10
11
12
13
14
15
16
17
18
19
20
21
22
23
24
25
26
27
28
29
30
31
32
33
34
35
36
37
38
39
40
41
42
43
44
45
46
47
@Override
public Object postProcessBeforeInitialization(Object bean, String beanName)
throws BeansException {
//直接通过查找添加了ConfigurationProperties注解的的类
ConfigurationProperties annotation = AnnotationUtils
.findAnnotation(bean.getClass(), ConfigurationProperties.class);
if (annotation != null) {
postProcessBeforeInitialization(bean, beanName, annotation);
}
//查找使用工厂bean中是否有ConfigurationProperties注解
annotation = this.beans.findFactoryAnnotation(beanName,
ConfigurationProperties.class);
if (annotation != null) {
postProcessBeforeInitialization(bean, beanName, annotation);
}
return bean;
}

private void postProcessBeforeInitialization(Object bean, String beanName,
ConfigurationProperties annotation) {
Object target = bean;
PropertiesConfigurationFactory<Object> factory = new PropertiesConfigurationFactory<Object>(
target);
factory.setPropertySources(this.propertySources);
factory.setValidator(determineValidator(bean));
// If no explicit conversion service is provided we add one so that (at least)
// comma-separated arrays of convertibles can be bound automatically
factory.setConversionService(this.conversionService == null
? getDefaultConversionService() : this.conversionService);
if (annotation != null) {
factory.setIgnoreInvalidFields(annotation.ignoreInvalidFields());
factory.setIgnoreUnknownFields(annotation.ignoreUnknownFields());
factory.setExceptionIfInvalid(annotation.exceptionIfInvalid());
factory.setIgnoreNestedProperties(annotation.ignoreNestedProperties());
if (StringUtils.hasLength(annotation.prefix())) {
factory.setTargetName(annotation.prefix());
}
}
try {
factory.bindPropertiesToTarget();
}
catch (Exception ex) {
String targetClass = ClassUtils.getShortName(target.getClass());
throw new BeanCreationException(beanName, "Could not bind properties to "
+ targetClass + " (" + getAnnotationDetails(annotation) + ")", ex);
}
}

+ 在 postProcessBeforeInitialization 方法中,会先去找所有添加了 ConfigurationProperties 注解的类对象,找到后调用 postProcessBeforeInitialization 进行属性数据装配。
+ 那么现在可以将实现拆分成如何寻找和如何装配两部分来说明,首先先看下如何查找到 ConfigurationProperties 注解类呢?
  • 查找 ConfigurationProperties
    • 在 postProcessBeforeInitialization 方法中先通过 AnnotationUtils 查找类是否添加了 @ConfigurationProperties 注解,然后再通过
      1
      2
      this.beans.findFactoryAnnotation(beanName,
      ConfigurationProperties.class);
+ 下面详解这两步查找的作用:

  + AnnotationUtils:AnnotationUtils.findAnnotation(bean.getClass(),ConfigurationProperties.class);这个是 Spring 中常用的工具类了,通过反射的方式获取类上的注解,如果此类添加了注解 @ConfigurationProperties 那么这个方法会返回这个注解对象和类上配置的注解属性。

  + beans.findFactoryAnnotation:这里的 beans 是 ConfigurationBeanFactoryMetaData 对象。在 Spring 中,可以以工厂 bean 的方式添加 Bean,这个类的作用就是在工程 Bean 中找到 @ConfigurationProperties 注解。下面分析下实现过程。

- ConfigurationBeanFactoryMetaData
1
2
3
4
5
6
7
8
9
10
11
12
13
14
15
16
17
18
19
20
21
22
23
24
25
26
27
28
29
30
31
32
33
34
35
36
37
38
39
40
41
42
43
44
45
46
47
public class ConfigurationBeanFactoryMetaData implements BeanFactoryPostProcessor {

private ConfigurableListableBeanFactory beanFactory;

private Map<String, MetaData> beans = new HashMap<String, MetaData>();

@Override
public void postProcessBeanFactory(ConfigurableListableBeanFactory beanFactory)
throws BeansException {
this.beanFactory = beanFactory;
//迭代所有的bean定义,找出那些是工厂bean的对象添加到beans中
for (String name : beanFactory.getBeanDefinitionNames()) {
BeanDefinition definition = beanFactory.getBeanDefinition(name);
String method = definition.getFactoryMethodName();
String bean = definition.getFactoryBeanName();
if (method != null && bean != null) {
this.beans.put(name, new MetaData(bean, method));
}
}
}

public <A extends Annotation> Map<String, Object> getBeansWithFactoryAnnotation(
Class<A> type) {
Map<String, Object> result = new HashMap<String, Object>();
for (String name : this.beans.keySet()) {
if (findFactoryAnnotation(name, type) != null) {
result.put(name, this.beanFactory.getBean(name));
}
}
return result;
}

public <A extends Annotation> A findFactoryAnnotation(String beanName,
Class<A> type) {
Method method = findFactoryMethod(beanName);
return (method == null ? null : AnnotationUtils.findAnnotation(method, type));
}

//略...

private static class MetaData {
private String bean;
private String method;
//构造方法和其他方法略...
}

}
  • 通过以上代码可以得出 ConfigurationBeanFactoryMetaData 的工作机制,通过实现 BeanFactoryPostProcessor,
    在回调方法 postProcessBeanFactory 中,查找出所有通过工厂 Bean 实现的对象,并将其保存到 Beans Map 中,
    通过方法 findFactoryAnnotation 可以查询到工厂 Bean 中是否添加了对应的注解。
    那么这里的功能就是查找工厂 Bean 中有添加 @ConfigurationProperties 注解的类了

  • 属性值注入

    • 通过上述步骤,已经确认了当前传入的 Bean 是否添加了 @ConfigurationProperties 注解。如果添加了则下一步就需要进行属性值注入了,核心代码在方法 postProcessBeforeInitialization 中:
    1
    2
    3
    4
    5
    6
    7
    8
    9
    10
    11
    12
    13
    14
    15
    16
    17
    18
    19
    20
    21
    22
      private void postProcessBeforeInitialization(Object bean, String beanName,
    ConfigurationProperties annotation) {
    Object target = bean;
    PropertiesConfigurationFactory<Object> factory = new PropertiesConfigurationFactory<Object>(
    target);
    //重点,这里设置数据来源
    factory.setPropertySources(this.propertySources);
    factory.setValidator(determineValidator(bean));
    //设置转换器
    factory.setConversionService(this.conversionService == null
    ? getDefaultConversionService() : this.conversionService);
    if (annotation != null) {
    //将annotation中配置的属性配置到factory中
    }
    try {
    //这里是核心,绑定属性值到对象中
    factory.bindPropertiesToTarget();
    }
    catch (Exception ex) {
    //抛出异常
    }
    }
    • 继续跟进 factory.bindPropertiesToTarget 方法,在 bindPropertiesToTarget 方法中,调用的是 doBindPropertiesToTarget 方法:

      1
      2
      3
      4
      5
      6
      7
      8
      9
      10
      11
      12
      13
      14
      15
      16
       private void doBindPropertiesToTarget() throws BindException {
      RelaxedDataBinder dataBinder
      //略...
      //1、获取bean中所有的属性名称
      Set<String> names = getNames(relaxedTargetNames);
      //2、将属性名称和前缀转换为配置文件的key值
      PropertyValues propertyValues = getPropertySourcesPropertyValues(names,relaxedTargetNames);
      //3、通过上面两个步骤找到的属性从配置文件中获取数据通过反射注入到bean中
      dataBinder.bind(propertyValues);
      //数据校验
      if (this.validator != null) {
      dataBinder.validate();
      }
      //判断数据绑定过程中是否有错误
      checkForBindingErrors(dataBinder);
      }
    • 上面代码中使用 dataBinder.bind 方法进行属性值赋值,源码如下:

      1
      2
      3
      4
      5
      6
      7
      8
      9
      10
      11
      12
      13
      14
      15
      16
      17
      18
      19
      20
      21
      22
      23
        public void bind(PropertyValues pvs) {
      MutablePropertyValues mpvs = (pvs instanceof MutablePropertyValues) ?
      (MutablePropertyValues) pvs : new MutablePropertyValues(pvs);
      doBind(mpvs);
      }
      protected void doBind(MutablePropertyValues mpvs) {
      checkAllowedFields(mpvs);
      checkRequiredFields(mpvs);
      //进行赋值
      applyPropertyValues(mpvs);
      }
      protected void applyPropertyValues(MutablePropertyValues mpvs) {
      try {
      // Bind request parameters onto target object.
      getPropertyAccessor().setPropertyValues(mpvs, isIgnoreUnknownFields(), isIgnoreInvalidFields());
      }
      catch (PropertyBatchUpdateException ex) {
      // Use bind error processor to create FieldErrors.
      for (PropertyAccessException pae : ex.getPropertyAccessExceptions()) {
      getBindingErrorProcessor().processPropertyAccessException(pae, getInternalBindingResult());
      }
      }
      }
  • 经过以上步骤连续的方法调用后,最终调用的是 ConfigurablePropertyAccessor.setPropertyValues 使用反射进行设置属性值,到这里就不继续深入了。
    想要继续深入了解的可以继续阅读源码,到最后可以发现调用的是 AbstractNestablePropertyAccessor.processLocalProperty 中使用反射进行赋值。
    通过上面的代码分析就非常清晰明了的解释了如何查找 @ConfigurationProperties 对象和如何使用反射的方式进行赋值

总结

  • 通过上面的步骤分析了 @ConfigurationProperties 分析了如何筛选 Bean 到如何注入属性值的过程,整个过程的难度还不算高,没有什么特别的难点,这又是一个非常好的 BeanPostProcessor 使用场景说明

BeanPostProcessor使用及源码分析

发表于 2018-05-22 | 更新于 2019-04-19 | 分类于 spring boot
  • 在 Spring 环境中,如果需要在 Bean 自动装配(属性都注入 ok)完成后进行自定义操作,通常只需要实现接口 InitializingBean,在 afterPropertiesSet 方法中执行操作即可。
    在这个接口回调时,Bean 中所有的属性已经注入完成了。比如在 Bean 初始化完成后添加一段 log:

    1
    2
    3
    4
    5
    6
    7
    8
    9
    10
    11
    12
    @Component
    public class MyBean implements InitializingBean {
    private Logger log = LoggerFactory.getLogger(MyBean.class);

    @Override
    public void afterPropertiesSet() throws Exception {
    log.info("=======>afterPropertiesSet");
    }
    }

    项目启动后可以看到 log 输出:
    INFO com.cml.chat.lesson.lesson2.MyBean - =======>afterPropertiesSet
  • 这样的实现方式适合单独的 Bean,如果有多个 Bean 都具有一样的业务逻辑,那么抽象出一个共同类出来即可。
    所有的类都继承这个抽象类,但是这样的方式代码入侵大,不太适合用于框架类的项目和共通业务逻辑处理。
    那么如何更优雅的在 Bean 初始化前后自定义进行处理呢?这时候 BeanPostProcessor 就派上用场了

BeanPostProcessor

  • BeanPostProcessor 接口提供了以下方法:

    • postProcessBeforeInitialization:在 Bean 初始化回调前调用
    • postProcessAfterInitialization:在 Bean 初始化回调完成后进行调用,而且会在 afterPropertiesSet 方法回调之后
  • 两个方法可以在 Bean 初始化回调前后进行处理,而且使用也非常简单,只需要实现 BeanPostProcessor 接口就可以在 Bean 初始化回调前后进行处理其他业务逻辑。这里做个简单的使用示例

实战

  • 先定义好 IMyBean 接口,提供 setCustomValue、getCustomValue 两个方法,当所有 IMyBean 对象 getCustomValue 获取数据为空时,自动设置 customValue 为默认值 “defaultValue”:

    1
    2
    3
    4
    5
    6
    7
    8
    9
    10
    11
    12
    13
    14
    15
    16
    17
    18
    19
    20
    public interface IMyBean {
    void setCustomValue(String v);
    String getCustomValue();
    }

    定义好 MyBean 实现 IMyBean 接口:

    @Component
    public class MyBean implements IMyBean {
    private String customValue;

    public String getCustomValue() {
    return customValue;
    }

    public void setCustomValue(String customValue) {
    this.customValue = customValue;
    }

    }
  • 实现BeanPostProcessor接口

    1
    2
    3
    4
    5
    6
    7
    8
    9
    10
    11
    12
    13
    14
    15
    16
    17
    18
    19
    20
    21
    22
    23
    @Component
    public class MyBeanPostProcessor implements BeanPostProcessor {

    private Logger log = LoggerFactory.getLogger(MyBeanPostProcessor.class);

    @Override
    public Object postProcessBeforeInitialization(Object bean, String beanName) throws BeansException {
    return bean;
    }

    @Override
    public Object postProcessAfterInitialization(Object bean, String beanName) throws BeansException {
    if (bean instanceof IMyBean) {
    log.info("=======>postProcessAfterInitialization");
    IMyBean mybean = (IMyBean) bean;
    if (mybean.getCustomValue() == null) {
    mybean.setCustomValue("defaultValue");
    }
    }
    return bean;
    }

    }
  • 运行

    1
    2
    3
    4
    5
    6
    7
    8
    9
    10
    11
    12
    13
    14
    15
    16
    17
    18
    @SpringBootApplication()
    public class Application {
    private static Logger log=LoggerFactory.getLogger(Application.class);

    public static void main(String[] args) throws Exception {
    SpringApplication springApplication = new SpringApplication(Application.class);
    // 非web环境
    springApplication.setWebEnvironment(false);
    ConfigurableApplicationContext application = springApplication.run(args);
    MyBean mybean = application.getBean(MyBean.class);
    log.info("getCustomValue:"+mybean.getCustomValue());
    }
    }

    log:
    com.cml.chat.lesson.lesson2.Application - getCustomValue:defaultValue

    输出:com.cml.chat.lesson.lesson2.Application - getCustomValue:myCustomValue
  • 这样简单的 BeanPostProcessor 就实现了,那么为什么只要实现 BeanPostProcessor 接口就可以了?
    Spring 是如何识别 BeanPostProcessor 的呢?那么这时候该来剖析下 BeanPostProcessor 实现原理了

BeanPostProcessor 原理解析

  • 在 Spring 中,所有的 Bean 都是通过 BeanFactory 进行管理的,Spring Boot 中使用的是 DefaultListableBeanFactory。
    可以从以下代码获取 Spring Boot 使用的 BeanFactory

    1
    2
    3
    4
    5
    6
    7
    8
    9
    10
    11
    12
    13
    14
    15
    16
    17
    18
    19
    @SpringBootApplication()
    public class Application {
    private static Logger log = LoggerFactory.getLogger(Application.class);

    public static void main(String[] args) throws Exception {
    SpringApplication springApplication = new SpringApplication(Application.class);
    // 非web环境
    springApplication.setWebEnvironment(false);
    ConfigurableApplicationContext application = springApplication.run(args);
    log.info("beanFactory===>" + application.getBeanFactory().getClass());

    application.close();
    }
    }

    输出log:
    com.cml.chat.lesson.lesson2.Application - beanFactory===>class org.springframework.beans.factory.support.DefaultListableBeanFactory

    说明:可以看出BeanFactory默认实现类是:DefaultListableBeanFactory
  • 当获取 Bean 时,都是通过调用 BeanFactory.getBean 方法获得的。在 SpingBoot 中 BeanFactory 默认使用的是 DefaultListableBeanFactory。
    知道了 BeanFactory 就相当于找到了所有 bean 相关的入口。那么剩下的就该来剖析下 BeanPostProcessor 实现原理了

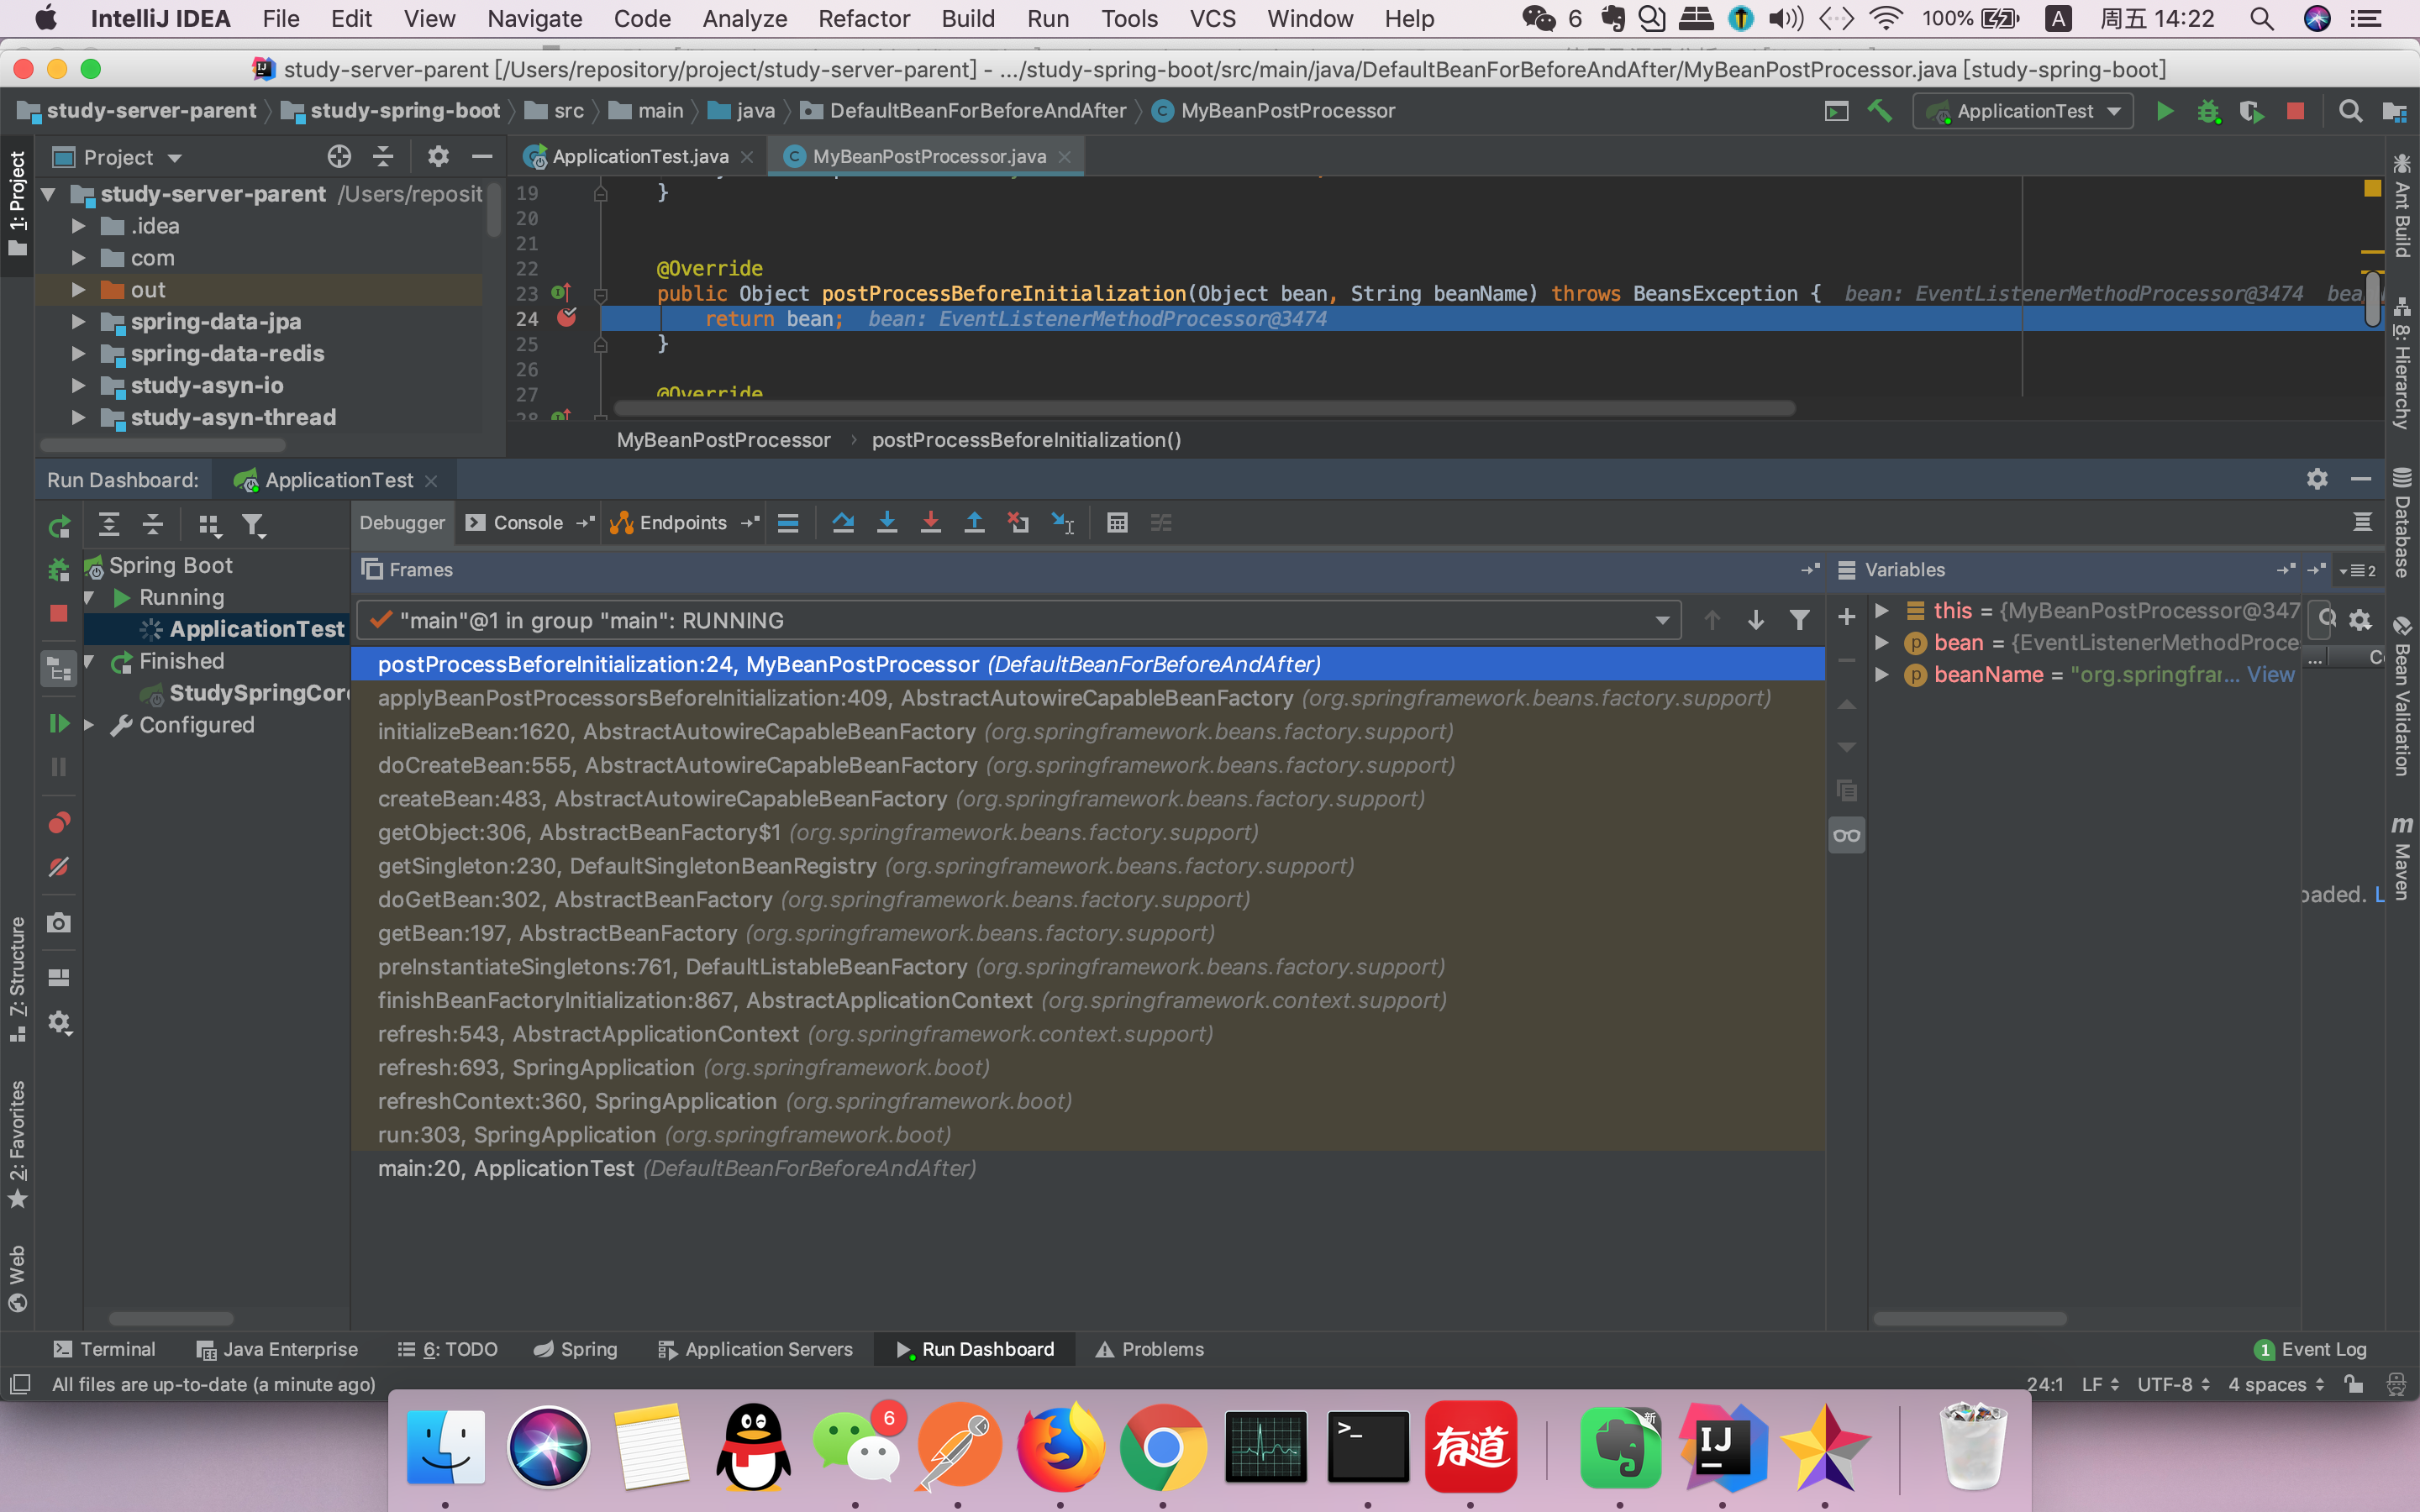
  • 说下一个万能的原理查看方法,只要在对应的调用地方添加断点,当断点进入后就可以看到整个方法调用链,这样就可以知道整个流程是如何运作了。
    就从上面的例子来说在 MyBeanPostProcessor.postProcessBeforeInitialization 方法中添加断点,Debug 运行后可得到如下

    BeanPostProcessor

  • 是不是非常直观,从 Application 调用入口,到断点 MyBeanPostProcessor.postProcessBeforeInitialization 中间的所有调用过程都展示出来了,
    那么源码阅读的话就可以按照这个流程逆向进行分析就可以了
    • 根据调用链可以进入 AbstractAutowireCapableBeanFactory.initializeBean 方法中:
      1
      2
      3
      4
      5
      6
      7
      8
      9
      10
      11
      12
      13
      14
      15
      16
      17
      18
      19
      20
      21
      22
      23
      24
      25
      26
      27
      28
      29
      30
      31
      32
      33
      34
      35
      36
      37
      38
      39
      40
      41
      42
      43
      44
      45
      46
      47
      48
      49
      50
      51
      52
      53
      54
      55
      56
      57
      58
      59
      60
      61
      62
      63
      protected Object initializeBean(final String beanName, final Object bean, RootBeanDefinition mbd) {
      //略...

      Object wrappedBean = bean;
      if (mbd == null || !mbd.isSynthetic()) {
      //这里调用了postProcessBeforeInitialization
      wrappedBean = applyBeanPostProcessorsBeforeInitialization(wrappedBean, beanName);
      }

      try {
      invokeInitMethods(beanName, wrappedBean, mbd);
      }
      catch (Throwable ex) {
      throw new BeanCreationException(
      (mbd != null ? mbd.getResourceDescription() : null),
      beanName, "Invocation of init method failed", ex);
      }

      if (mbd == null || !mbd.isSynthetic()) {
      //这里调用了postProcessAfterInitialization
      wrappedBean = applyBeanPostProcessorsAfterInitialization(wrappedBean, beanName);
      }
      return wrappedBean;
      }

      applyBeanPostProcessorsBeforeInitialization 方法:
      获取系统中所有的 BeanPostProcessor 对象,并调用其 postProcessBeforeInitialization 方法:

      public Object applyBeanPostProcessorsBeforeInitialization(Object existingBean, String beanName)
      throws BeansException {

      Object result = existingBean;
      for (BeanPostProcessor beanProcessor : getBeanPostProcessors()) {
      result = beanProcessor.postProcessBeforeInitialization(result, beanName);
      if (result == null) {
      return result;
      }
      }
      return result;
      }

      applyBeanPostProcessorsAfterInitialization
      获取系统中所有的 BeanPostProcessor 对象,并调用其 postProcessAfterInitialization 方法:

      public Object applyBeanPostProcessorsAfterInitialization(Object existingBean, String beanName)
      throws BeansException {

      Object result = existingBean;
      for (BeanPostProcessor beanProcessor : getBeanPostProcessors()) {
      result = beanProcessor.postProcessAfterInitialization(result, beanName);
      if (result == null) {
      return result;
      }
      }
      return result;
      }


      getBeanPostProcessors(),这里就更简单了,直接获取到 BeanPostProcessor 对象集合。

      public List<BeanPostProcessor> getBeanPostProcessors() {
      return this.beanPostProcessors;
      }
  • 那么,在什么时候将 BeanPostProcessor 对象都添加到集合中去的呢?
    在 Spring 初始化完成后会回调 ApplicationContext 中的 refresh 方法,
    在 AbstractApplicationContext 中完成了共通的实现。在 refresh 方法中:

    1
    2
    3
    4
    5
    6
    7
    8
    9
    10
    11
    12
    13
    14
    15
    16
    17
    18
    19
    20
    21
    22
    23
    @Override
    public void refresh() throws BeansException, IllegalStateException {
    synchronized (this.startupShutdownMonitor) {
    //略。。。

    //从这里注册BeanPostProcessors
    registerBeanPostProcessors(beanFactory);

    //略。。。
    }
    }

    registerBeanPostProcessors 这里非常简单的调用了 PostProcessorRegistrationDelegate,将 BeanFactory 作为参数传入,那么这里是不是就是可以猜想出是如何获取 BeanPostProcessor 的吧!

    protected void registerBeanPostProcessors(ConfigurableListableBeanFactory beanFactory) {
    PostProcessorRegistrationDelegate.registerBeanPostProcessors(beanFactory, this);
    }
    继续跟入到 registerBeanPostProcessors,这里的第一句代码就很清楚的说明了获取的方式,从 Bean 工厂中获取到所有 BeanPostProcessor 实现类。

    public static void registerBeanPostProcessors(
    ConfigurableListableBeanFactory beanFactory, AbstractApplicationContext applicationContext) {

    String[] postProcessorNames = beanFactory.getBeanNamesForType(BeanPostProcessor.class, true, false);}
  • 获取完所有实现类后,根据实现类上的顺序进行排序,然后将排序好的集合对象调用 BeanFactory.addBeanPostProcessor 注册到 BeanFactory 中。这样在 AbstractAutowireCapableBeanFactory 中就可以从它的父类 AbstractBeanFactory 中直接获取到 BeanPostProcessor 集合对象了,
    也就是上面调用的 getBeanPostProcessors() 方法。registerBeanPostProcessors 方法实现的代码没有什么难度,这里就不多贴代码了。

    以上代码从 getBean 入口到实际调用 BeanPostProcessor 接口的核心流程分析完毕了。知道了 BeanPostProcessor 执行过程,那么 InitializingBean 的是何时回调的呢?

    AbstractAutowireCapableBeanFactory.initializeBean 方法中调用 applyBeanPostProcessorsBeforeInitialization 方法后,调用了 invokeInitMethods 方法。
    从方法的实现代码可以看出,如果 Bean 实现了 InitializingBean 接口,就回调 afterPropertiesSet 方法

    1
    2
    3
    4
    5
    6
    7
    8
    9
    10
    11
    12
    13
    14
    15
    16
    17
    18
    19
    20
    21
    22
    23
    24
    25
    26
    27
    28
    29
    30
    31
    32
    33
    34
    protected void invokeInitMethods(String beanName, final Object bean, RootBeanDefinition mbd)
    throws Throwable {

    boolean isInitializingBean = (bean instanceof InitializingBean);
    if (isInitializingBean && (mbd == null || !mbd.isExternallyManagedInitMethod("afterPropertiesSet"))) {
    if (logger.isDebugEnabled()) {
    logger.debug("Invoking afterPropertiesSet() on bean with name '" + beanName + "'");
    }
    if (System.getSecurityManager() != null) {
    try {
    AccessController.doPrivileged(new PrivilegedExceptionAction<Object>() {
    public Object run() throws Exception {
    ((InitializingBean) bean).afterPropertiesSet();
    return null;
    }
    }, getAccessControlContext());
    }
    catch (PrivilegedActionException pae) {
    throw pae.getException();
    }
    }
    else {
    ((InitializingBean) bean).afterPropertiesSet();
    }
    }

    if (mbd != null) {
    String initMethodName = mbd.getInitMethodName();
    if (initMethodName != null && !(isInitializingBean && "afterPropertiesSet".equals(initMethodName)) &&
    !mbd.isExternallyManagedInitMethod(initMethodName)) {
    invokeCustomInitMethod(beanName, bean, mbd);
    }
    }
    }
  • 这样 BeanPostProcessor 和 InitializingBean 的执行关系如下:postProcessBeforeInitialization→afterPropertiesSet→postProcessAfterInitialization
    在 Bean 加载完成后回调中,还可以使用 @PostConstruct 实现。能够实现和 InitializingBean 一样的效果,测试同上面一样
    需要在postConstruct对应方法加入断点,可查看方法调用链

  • 笔者这里主要阐述下@PostConstruct的原理和代码分析:

    • @PostConstruct 是通过反射进行调用的。在 InitDestroyAnnotationBeanPostProcessor.postProcessBeforeInitialization 通过反射调用方法。源码如下:

      1
      2
      3
      4
      5
      6
      7
      8
      9
      10
      11
      12
      13
      public Object postProcessBeforeInitialization(Object bean, String beanName) throws BeansException {
      LifecycleMetadata metadata = findLifecycleMetadata(bean.getClass());
      try {
      metadata.invokeInitMethods(bean, beanName);
      }
      catch (InvocationTargetException ex) {
      throw new BeanCreationException(beanName, "Invocation of init method failed", ex.getTargetException());
      }
      catch (Throwable ex) {
      throw new BeanCreationException(beanName, "Couldn't invoke init method", ex);
      }
      return bean;
      }
    • 这里可以看出,@PostConstruct 其实也是通过 BeanPostProcessor 机制来实现的,
      这个可以说是 BeanPostProcessor 使用的一个非常好的例子的。其中 LifecycleMetadata 存储了添加了
      @PostConstruct 注解的所有方法,然后通过反射循环调用所有的对应的方法。这里的源码就不继续深究了,有兴趣的可以自行查看下

总结

  • 这里就可以得出 @PostConstruct、BeanPostProcessor、InitializingBean 他们之间的调用关系:

    BeanPostProcessor.postProcessBeforeInitialization→ @PostConstruct→ InitializingBean→ BeanPostProcessor.postProcessAfterInitialization

    既然 @PostConstruct、BeanPostProcessor、InitializingBean 都可以实现在 Bean 初始化完成后执行特定的操作,至于使用哪种还是看项目的使用习惯了,通常来说 InitializingBean 是使用最多的,
    @PostConstruct 使用注解的方式来实现的话不够直观,对后期维护来说可能不太适合。
    BeanPostProcessor 比较适合在框架类型或者面向特定接口使用。 这里重点还是 BeanPostProcessor,
    通过这个接口可以进行更多的业务逻辑操作,至于如何取舍那么就需要看项目的实际情况了

MyBatis与SpringBoot的结合及代码分析

发表于 2018-04-16 | 更新于 2019-04-16 | 分类于 myBatis

MyBatis提供了MyBatis-Spring-Boot-Starter项目用于MyBatis与SpringBoot的整合。充分利用了SpringBoot自动配置的优点,使用起来非常方便。我们来看一下简单的使用:

阅读全文 »

myBatis-spring结合及源码分析

发表于 2018-04-15 | 更新于 2019-04-16 | 分类于 myBatis

MyBatis与Spring的结合依赖于MyBatis-Spring。MyBatis-Spring会帮助你将MyBatis代码无缝地整合到Spring中。使用这个类库中的类,Spring将会加载必要的MyBatis工厂类和session类。这个类库也提供一个简单的方式来注入MyBatis数据映射器和SqlSession到业务层的bean中。而且它也会处理事务,翻译MyBatis的异常到Spring的DataAccessException异常(数据异常)。

阅读全文 »

maven整理

发表于 2018-04-12 | 更新于 2019-04-25 | 分类于 maven

Maven命令整理

阅读全文 »

myBatis源码分析

发表于 2018-04-12 | 更新于 2019-04-16 | 分类于 myBatis
  • 在上一篇文章的基础上,我们从代码级别来分析一下MyBatis的执行过程

  • Mybatis的运行分为两大部分,第一部分是读取配置文件到Configuration对象,用以创建SqlSessionFactory,第二部分是SqlSession的执行过程

构建SqlSessionFactory的过程

  • 代码如下:

    1
    2
    3
    String resource = "mybatis-config.xml";
    InputStream inputStream = Resources.getResourceAsStream(resource);
    SqlSessionFactory sqlSessionFactory = new SqlSessionFactoryBuilder().build(inputStream);
  • 通过上面代码,我们看看SqlSessionFactory的构建过程

  • SqlSessionFactoryBuilder是一个builder类,它提供了多种build方法。build方法最终调用的以下两句话:

    1
    2
    3
    4
    5
    6
    7
    XMLConfigBuilder parser = new XMLConfigBuilder(inputStream, environment, properties);
    return build(parser.parse());

    // build(parser.parse())调用的下面的方法
    public SqlSessionFactory build(Configuration config) {
    return new DefaultSqlSessionFactory(config);
    }
  • 可以看到SqlSessionFactoryBuilder的构建分为两步:

    • 通过XMlConfigBuilder来解析XML,并将读取的配置保存在Configuration来中,这个类保存来myBatis涉及到的所有配置
    • 使用Configuration来构建SqlSessionFactory,SqlSessionFactory是一个接口,mybatis默认提供了DefaultSqlSessionFactory实现类

构建Configuration

  • 构建SqlSessionFactory过程中,Configuration最重要的。它构建的代码如下:

    1
    2
    3
    4
    5
    6
    7
    8
    9
    10
    11
    12
    13
    14
    15
    16
    17
    18
    19
    20
    21
    22
    23
    24
    25
    26
    27
    28
    public Configuration parse() {
    if (parsed) {
    throw new BuilderException("Each XMLConfigBuilder can only be used once.");
    }
    parsed = true;
    parseConfiguration(parser.evalNode("/configuration"));
    return configuration;
    }

    private void parseConfiguration(XNode root) {
    try {
    propertiesElement(root.evalNode("properties"));
    Properties settings = settingsAsProperties(root.evalNode("settings"));
    loadCustomVfs(settings);
    typeAliasesElement(root.evalNode("typeAliases"));
    pluginElement(root.evalNode("plugins"));
    objectFactoryElement(root.evalNode("objectFactory"));
    objectWrapperFactoryElement(root.evalNode("objectWrapperFactory"));
    reflectorFactoryElement(root.evalNode("reflectorFactory"));
    settingsElement(settings);
    environmentsElement(root.evalNode("environments"));
    databaseIdProviderElement(root.evalNode("databaseIdProvider"));
    typeHandlerElement(root.evalNode("typeHandlers"));
    mapperElement(root.evalNode("mappers"));
    } catch (Exception e) {
    throw new BuilderException("Error parsing SQL Mapper Configuration. Cause: " + e, e);
    }
    }
  • 我们看到parse()方法会判断Configuration是否已经构建过了,它只会构建一次.然后调用parseConfiguration(XNode root)方法解析XML文件中各种配置信息,
    将这些信息保存到Configuraion中,包括:

    • properties全局参数
    • settings设置
    • typeAliases别名
    • typeHandler类型处理器
    • ObjectFactory对象
    • plugin插件
    • environment环境
    • DatabaseIdProvider数据库标识
    • Mapper映射器
  • 来看两个比较重要的配置,environment , Mapper映射器

environment

  • environment的构建在environmentsElement方法中:

    1
    2
    3
    4
    5
    6
    7
    8
    9
    10
    11
    12
    13
    14
    15
    16
    17
    18
    19
    private void environmentsElement(XNode context) throws Exception {
    if (context != null) {
    if (environment == null) {
    environment = context.getStringAttribute("default");
    }
    for (XNode child : context.getChildren()) {
    String id = child.getStringAttribute("id");
    if (isSpecifiedEnvironment(id)) {
    TransactionFactory txFactory = transactionManagerElement(child.evalNode("transactionManager"));
    DataSourceFactory dsFactory = dataSourceElement(child.evalNode("dataSource"));
    DataSource dataSource = dsFactory.getDataSource();
    Environment.Builder environmentBuilder = new Environment.Builder(id)
    .transactionFactory(txFactory)
    .dataSource(dataSource);
    configuration.setEnvironment(environmentBuilder.build());
    }
    }
    }
    }
  • 可以看到,environment的构建分为4步

    • 获取ID属性,保证xml中environments节点下的environment的唯一
    • 获取transactionManager属性构建TransactionFactory
    • 获取dataSource属性构建DataSource
    • 最后通过前面的id、TransactionFactory、DataSource创建Environment

      mappers

  • mappers的构建在mapperElement方法中:

    1
    2
    3
    4
    5
    6
    7
    8
    9
    10
    11
    12
    13
    14
    15
    16
    17
    18
    19
    20
    21
    22
    23
    24
    25
    26
    27
    28
    29
    30
    private void mapperElement(XNode parent) throws Exception {
    if (parent != null) {
    for (XNode child : parent.getChildren()) {
    if ("package".equals(child.getName())) {
    String mapperPackage = child.getStringAttribute("name");
    configuration.addMappers(mapperPackage);
    } else {
    String resource = child.getStringAttribute("resource");
    String url = child.getStringAttribute("url");
    String mapperClass = child.getStringAttribute("class");
    if (resource != null && url == null && mapperClass == null) {
    ErrorContext.instance().resource(resource);
    InputStream inputStream = Resources.getResourceAsStream(resource);
    XMLMapperBuilder mapperParser = new XMLMapperBuilder(inputStream, configuration, resource, configuration.getSqlFragments());
    mapperParser.parse();
    } else if (resource == null && url != null && mapperClass == null) {
    ErrorContext.instance().resource(url);
    InputStream inputStream = Resources.getUrlAsStream(url);
    XMLMapperBuilder mapperParser = new XMLMapperBuilder(inputStream, configuration, url, configuration.getSqlFragments());
    mapperParser.parse();
    } else if (resource == null && url == null && mapperClass != null) {
    Class<?> mapperInterface = Resources.classForName(mapperClass);
    configuration.addMapper(mapperInterface);
    } else {
    throw new BuilderException("A mapper element may only specify a url, resource or class, but not more than one.");
    }
    }
    }
    }
    }
  • 遍历mappers下所有的mapper定义,根据mapper不同类型的定义将Mapper加入configuration中

    • 如果定义的是package或者mapper定义了class,调用MapperRegistry.addMapper(Class type),在其中调用MapperAnnotationBuilder.parse()方法解析Mapper类

      • 解析对应的xml文件,这个文件必须和Mapper类处于同一package下
      • 解析cache
      • 解析cache-ref
      • 解析每个method,生成MappedStatement
    • 如果mapper定义了resource或者定义了url,调用XMLMapperBuilder.configurationElement()方法解析xml文件:

      • 解析namespace
      • 解析cache-ref:其他命名空间缓存配置的引用
      • 解析cache:给定命名空间的缓存配置
      • 解析parameterMap:已废弃
      • 解析resultMap:描述如何从数据库结果集中来记载对象
      • 解析sql:可被其他语句引用的可重用语句块
      • 解析insert|update|delete|select语句
  • 经过上面的解析,Environment信息放在Configuration的environment变量中。
    节点的映射信息(select|insert|delete|update)封装成MappedStatement放在Configuration的mappedStatements变量中。
    结果的映射信息封装成ResultMap放在Configuration的resultMaps变量中。

SqlSession的执行过程

  • openSession

    • SqlSession最佳的作用域是请求或方法作用域。每次使用SqlSession的时候都需要调用SqlSessionFactory.openSession()方法来获取一个新的SqlSession。SqlSession的新建过程如下:

      1
      2
      3
      4
      5
      final Environment environment = configuration.getEnvironment();
      final TransactionFactory transactionFactory = getTransactionFactoryFromEnvironment(environment);
      tx = transactionFactory.newTransaction(environment.getDataSource(), level, autoCommit);
      final Executor executor = configuration.newExecutor(tx, execType);
      return new DefaultSqlSession(configuration, executor, autoCommit);
    • 可以看到使用Configuration和Executor来新建DefaultSqlSession。Executor中包含了Transaction

    • 获取Mapper

      • 接下去调用getMapper方法从SqlSession中获取Mapper实例,这个在MapperRegistry.getMapper方法中进行,主要代码如下:
        1
        2
        3
        4
        5
        6
        7
        8
        9
        10
        11
        12
        13
        14
        15
        final MapperProxyFactory<T> mapperProxyFactory = (MapperProxyFactory<T>) knownMappers.get(type);
        return mapperProxyFactory.newInstance(sqlSession);

        首先获取MapperProxyFactory,然后调用newInstance方法:

        public T newInstance(SqlSession sqlSession) {
        final MapperProxy<T> mapperProxy = new MapperProxy<T>(sqlSession, mapperInterface, methodCache);
        return newInstance(mapperProxy);
        }

        protected T newInstance(MapperProxy<T> mapperProxy) {
        return (T) Proxy.newProxyInstance(mapperInterface.getClassLoader(), new Class[] { mapperInterface }, mapperProxy);
        }

        可以看到,这里根据我们自己定义的mapper接口创建了一个动态代理,代理类是MapperProxy。
    • Mapper执行

    • 前面说到,获取mapper时返回的是一个代理类。因此执行mapper方法时调用的是MapperProxy的invoke方法:

      1
      2
      3
      4
      5
      6
      7
      8
      9
      10
      11
      12
      13
      14
      15
      16
      17
      18
      final MapperMethod mapperMethod = cachedMapperMethod(method);
      return mapperMethod.execute(sqlSession, args);

      根据原始的method生成一个MapperMethod,然后调用MapperMethod的execute方法。下面以SELECT类型来看看execute方法的执行过程:

      if (method.returnsVoid() && method.hasResultHandler()) {
      executeWithResultHandler(sqlSession, args);
      result = null;
      } else if (method.returnsMany()) {
      result = executeForMany(sqlSession, args);
      } else if (method.returnsMap()) {
      result = executeForMap(sqlSession, args);
      } else if (method.returnsCursor()) {
      result = executeForCursor(sqlSession, args);
      } else {
      Object param = method.convertArgsToSqlCommandParam(args);
      result = sqlSession.selectOne(command.getName(), param);
      }
    • 首先调用method.convertArgsToSqlCommandParam方法获取参数表ParamMap

    • 接着调用DefaultSqlSession.selectList方法:

      1
      2
      3
      4
      5
      6
      MappedStatement ms = configuration.getMappedStatement(statement);
      return executor.query(ms, wrapCollection(parameter), rowBounds, Executor.NO_RESULT_HANDLER);

      说明:
      从configuration中获取selectUser方法对应的MappedStatement
      调用executor的query方法
    • 在进入真正的执行方法之前,先了解一下4个重要的对象:

      • Executor:执行器,由它来调度StatementHandler、ParameterHandler、ResultHandler等来执行对应的SQL
      • StatementHandler:作用是使用数据库的Statement(PreparedStatement)执行操作,它是四大对象的核心,起到承上启下的作用
      • ParameterHandler:用于SQL对参数的处理
      • ResultHandler:用于最后数据集(ResultSet)的封装返回处理
    • Mapper执行的过程是通过Executor、StatementHandler、ParameterHandler、ResultHandler来完成数据库操作和结果返回的。

Executor.query

  • 执行器(Executor)起到了至关重要的作用。它是一个真正执行Java和数据库交互的东西。在MyBatis中存在三种执行器。我们可以在Mybatis的配置文件中进行选择(setting元素的属性defaultExecutorType):
    • SIMPLE,简易执行器,不配置它就是默认执行器
    • REUSE,会重用预处理语句(prepared statements)
    • BATCH,执行器将重用语句并执行批量更新
  • BaseExecutor.query方法:

    1
    2
    3
    4
    5
    public <E> List<E> query(MappedStatement ms, Object parameter, RowBounds rowBounds, ResultHandler resultHandler) throws SQLException {
    BoundSql boundSql = ms.getBoundSql(parameter);
    CacheKey key = createCacheKey(ms, parameter, rowBounds, boundSql);
    return query(ms, parameter, rowBounds, resultHandler, key, boundSql);
    }
    • 首先获取BoundSql实例,它是建立SQL和参数的地方,有3个常用属性:

      • SQL:我们书写在映射器里面的一条SQL
      • parameterObject:参数表
      • parameterMappings:一个List,每个元素都是一个ParameterMapping的对象。这个对象会描述我们的参数,包括:属性、名称、表达式、javaType、jdbcType、typeHandler等重要信息。通过它可以实现参数和SQL的结合,以便PreparedStatement能够通过它找到parameterObject对象的属性并设置参数,使得程序准确运行
    • 创建CacheKey

    • 调用另一个重载的query方法,query方法中调用BaseExecutor.queryFromDatabase方法,queryFromDatabase方法中调用Executor.doQuery方法

Executor.doQuery

1
2
3
4
5
6
7
8
9
10
11
public <E> List<E> doQuery(MappedStatement ms, Object parameter, RowBounds rowBounds, ResultHandler resultHandler, BoundSql boundSql) throws SQLException {
Statement stmt = null;
try {
Configuration configuration = ms.getConfiguration();
StatementHandler handler = configuration.newStatementHandler(wrapper, ms, parameter, rowBounds, resultHandler, boundSql);
stmt = prepareStatement(handler, ms.getStatementLog());
return handler.<E>query(stmt, resultHandler);
} finally {
closeStatement(stmt);
}
}
  • doQuery方法执行分为以下几个步骤:

    • 获取Configuration
    • 根据Configuration来创建StatementHandler
    • 调用prepareStatement方法创建Statement
    • 调用StatementHandler的query方法。
  • StatementHandler,数据库会话器(StatementHandler)是专门处理数据库会话的

  • 创建StatementHandler,StatementHandler在Configuration中创建:

    1
    2
    3
    4
    5
    public StatementHandler newStatementHandler(Executor executor, MappedStatement mappedStatement, Object parameterObject, RowBounds rowBounds, ResultHandler resultHandler, BoundSql boundSql) {
    StatementHandler statementHandler = new RoutingStatementHandler(executor, mappedStatement, parameterObject, rowBounds, resultHandler, boundSql);
    statementHandler = (StatementHandler) interceptorChain.pluginAll(statementHandler);
    return statementHandler;
    }
  • 可以看到,创建的真实对象是RoutingStatementHandler对象,它实现了接口StatementHandler

  • RoutingStatementHandler不是我们真实的服务对象,它是通过适配模式找到对应的StatementHandler来执行的。
    在MyBatis中,StatementHandler和Executor一样分为三种:SimpleStatementHandler、PreparedStatementHandler、CallableStatementHandler,他们分别对应三种Executor
  • RoutingStatementHandler定义了一个对象的适配器delegate,它是一个StatementHandler接口对象,构造方法根据配置来适配对应的StatementHandler对象。
    它的作用是给实现类对象的使用提供一个统一、简易的使用适配器。此为对象的适配模式,可以让我们使用现有的类和方法对外提供服务,也可以根据实际的需求对外屏蔽一些方法,甚至是加入新的服务

  • 下面我们以最常用的PreparedStatementHandler为例,看看它三个主要的方法:prepare、parameterize、query

  • prepare

    1
    2
    3
    4
    5
    6
    7
    8
    statement = instantiateStatement(connection);
    setStatementTimeout(statement, transactionTimeout);
    setFetchSize(statement);
    return statement;

    1 instantiateStatement()方法对SQL进行预编译,获得Statement
    2 超时设置
    3 获取的最大行数等的设置
  • parameterize

    • parameterize方法用于设置参数,它调用ParameterHandler的setParameters方法来完成。
    • 参数处理器(ParameterHandler)用于对预编译语句进行参数设置。它有两个方法:getParameterObject方法作用是返回参数对象,setParameters方法作用是设置预编译SQL语句的参数。
    • setParameters方法步骤如下:
      从parameterObject对象中获取参数
      然后使用typeHandler进行参数处理
      
  • query

    • 由于在执行前参数和SQL都被prepare()方法预编译,参数在parameterize()方法已经进行了设置。所以这里只要执行SQL,然后返回结果就可以了。
      1
      2
      3
      4
      5
      6
      7
      8
      9
        public <E> List<E> query(Statement statement, ResultHandler resultHandler) throws SQLException {
      PreparedStatement ps = (PreparedStatement) statement;
      ps.execute();
      return resultSetHandler.<E> handleResultSets(ps);
      }
      说明:
      1 首先调用Statement的execute方法,Statement是一个动态代理类,实际执行的是PreparedStatementLogger.invoke方法,在invoke方法中执行PreparedStatement的execute方法。

      2 然后调用DefaultResultSetHandler.handleResultSets来解析结果集

结果处理器

  • 结果处理器接口ResultSetHandler有一个默认实现类DefaultResultSetHandler。重点关注handleResultSets方法:

    1
    2
    3
    4
    5
    6
    7
    8
    9
    10
    11
    12
    13
    14
    15
    16
    17
    18
    19
    20
    21
    22
    23
    24
    25
    26
    27
    28
    29
    30
    31
    32
    33
    34
    35
    36
    37
    38
    public List<Object> handleResultSets(Statement stmt) throws SQLException {
    ErrorContext.instance().activity("handling results").object(mappedStatement.getId());

    final List<Object> multipleResults = new ArrayList<Object>();

    int resultSetCount = 0;
    // 将ResultSet包装成ResultSetWrapper
    ResultSetWrapper rsw = getFirstResultSet(stmt);

    List<ResultMap> resultMaps = mappedStatement.getResultMaps();
    int resultMapCount = resultMaps.size();
    validateResultMapsCount(rsw, resultMapCount);
    while (rsw != null && resultMapCount > resultSetCount) {
    ResultMap resultMap = resultMaps.get(resultSetCount);
    // handleResultSet方法是关键:根据resultMap将rsw中的结果数据设置到multipleResults列表中
    handleResultSet(rsw, resultMap, multipleResults, null);
    rsw = getNextResultSet(stmt);
    cleanUpAfterHandlingResultSet();
    resultSetCount++;
    }

    String[] resultSets = mappedStatement.getResultSets();
    if (resultSets != null) {
    while (rsw != null && resultSetCount < resultSets.length) {
    ResultMapping parentMapping = nextResultMaps.get(resultSets[resultSetCount]);
    if (parentMapping != null) {
    String nestedResultMapId = parentMapping.getNestedResultMapId();
    ResultMap resultMap = configuration.getResultMap(nestedResultMapId);
    handleResultSet(rsw, resultMap, null, parentMapping);
    }
    rsw = getNextResultSet(stmt);
    cleanUpAfterHandlingResultSet();
    resultSetCount++;
    }
    }

    return collapseSingleResultList(multipleResults);
    }
    • DefaultResultSetHandler.handleResultSet方法的核心是下面的代码:
      DefaultResultHandler defaultResultHandler = new DefaultResultHandler(objectFactory);
      // 调用handleRowValues解析查询结果,封装后的对象保存在defaultResultHandler中
      handleRowValues(rsw, resultMap, defaultResultHandler, rowBounds, null);
      multipleResults.add(defaultResultHandler.getResultList());
      
    • 如果没有嵌套查询,调用DefaultResultSetHandler.handleRowValuesForSimpleResultMap方法
    • handleRowValuesForSimpleResultMap方法遍历查询返回的ResultSet,
      调用getRowValue(ResultSetWrapper rsw, ResultMap resultMap)方法解析每行数据:
      • 调用createResultObject方法创建结果对象
      • 调用applyAutomaticMappings方法解析自动映射
      • 调用applyPropertyMappings方法解析手动的映射
      • 返回经过处理的结果对象

SQL执行过程总结

  • Executor会先调用StatementHandler的prepare()方法预编译SQL语句,同时设置一些基本运行的参数。
  • 然后用parameterize()方法启用ParameterHandler设置参数,完成预编译。然后执行查询。
  • 最后使用ResultSetHandler封装结果返回给调用者
1234
Rick Liu

Rick Liu

33 日志
17 分类
17 标签
GitHub E-Mail
推荐阅读
  • 百度前端技术学院
近期文章
  • Spring IOC级联容器原理
  • Mac版本破解starUML
  • starUML入门使用
  • Leader选举原理
  • 面试问题总结
© 2019 Rick Liu
由 Hexo 强力驱动 v3.8.0
|
主题 – NexT.Mist v7.1.0