在 SpringBoot 项目中集成其他框架是非常简单的,如果需要添加 WebMvc,只需要引入对应的依赖
1
2
3
4
<dependency>
<groupId>org.springframework.boot</groupId>
<artifactId>spring-boot-starter-web</artifactId>
</dependency>就可以了,这样就轻轻松松的把 WebMVC 给整合进来了,是不是超简单。就连 @EnableXX 注解都不需要,那是为什么呢?是时候来剖析其中的原理了。
SpringBoot 项目中通常是添加注解 @SpringBootApplication,这个注解集成了常用的几个注解:1
@SpringBootConfiguration,@EnableAutoConfiguration,@ComponentScan
如果只是单纯的启动 SpringBoot 项目的话,只需要添加 @SpringBootConfiguration 注解就可以了。这样项目是虽然可以正常启动与使用,但是就失去了 SpringBoot 给我们带来的便利性。SpringBoot 整合其他框架通常会有各种 AutoConfiguration,但是必须得添加 @EnableAutoConfiguration 注解才可以使用。这里来解析下:
在 SpringBoot 官方文档中,特别说明了 META-INF/spring.factories 目录的使用:1
2
3
4
5
6
7
8
9
10
11
12
13
1443.1 Understanding auto-configured beans
Under the hood, auto-configuration is implemented with standard @Configuration classes. Additional @Conditional annotations are used to constrain when the auto-configuration should apply. Usually auto-configuration classes use @ConditionalOnClass and @ConditionalOnMissingBean annotations. This ensures that auto-configuration only applies when relevant classes are found and when you have not declared your own @Configuration.
You can browse the source code of spring-boot-autoconfigure to see the @Configuration classes that we provide (see the META-INF/spring.factories file).
43.2 Locating auto-configuration candidates
Spring Boot checks for the presence of a META-INF/spring.factories file within your published jar. The file should list your configuration classes under the EnableAutoConfiguration key.
org.springframework.boot.autoconfigure.EnableAutoConfiguration=\
com.mycorp.libx.autoconfigure.LibXAutoConfiguration,\
com.mycorp.libx.autoconfigure.LibXWebAutoConfiguration
You can use the @AutoConfigureAfter or @AutoConfigureBefore annotations if your configuration needs to be applied in a specific order. For example, if you provide web-specific configuration, your class may need to be applied after WebMvcAutoConfiguration.
If you want to order certain auto-configurations that shouldn’t have any direct knowledge of each other, you can also use @AutoconfigureOrder. That annotation has the same semantic as the regular @Order annotation but provides a dedicated order for auto-configuration classes.大致意思是说 SpringBoot 会自动解析所有 jar 中的 META-INF/spring.factories 文件。其中大部分自动配置文件都放在了 spring-boot-autoconfigure 的 jar 中,可以根据自己的需要去看看。
如果需要指定自动配置类的顺序,可以使用 @AutoConfigureAfter @AutoConfigureBefore、@AutoconfigureOrder 进行设置顺序。那么来解析下 @EnableAutoConfiguration 注解做了什么。
源码分析
@EnableAutoConfiguration代码
1
2
3
4
5
6
7
8
9
10
11
12@SuppressWarnings("deprecation")
@Target(ElementType.TYPE)
@Retention(RetentionPolicy.RUNTIME)
@Documented
@Inherited
@AutoConfigurationPackage
@Import(EnableAutoConfigurationImportSelector.class)
public @interface EnableAutoConfiguration {
String ENABLED_OVERRIDE_PROPERTY = "spring.boot.enableautoconfiguration";
//略。。。
}发现这里使用了 @Import 注解,导入 EnableAutoConfigurationImportSelector 类。
@Import 可以将对应的 Bean 导入到 Spring 上下文中。如果类在工程中的话那么直接使用 @Configuration 注解即可,Spring 会自动识别的。但是如果在其他 jar 包或框架上,没有配置到自动扫描的目录中或者是没有添加 @Configuration 注解,那么就需要使用 @Import 将其导入到项目中来。
EnableAutoConfigurationImportSelector 继承了 AutoConfigurationImportSelector,实现了 isEnable 方法,当配置文件中配置 spring.boot.enableautoconfiguration=false 的时候,@EnableAutoConfiguration 功能为关闭状态,不进行其他自动逻辑处理。也就是所有的 EnableXX 框架都不能自动配置启动了。
ImportSelector 核心作用就是:将方法 selectImports 中返回的类数组导入到 Spring 上下文中。
AutoConfigurationImportSelector 间接的实现了 ImportSelector 接口,且实现为:
1
2
3
4
5
6
7
8
9
10
11
12
13
14
15
16
17
18
19
20
21
22
23
24
25@Override
public String[] selectImports(AnnotationMetadata annotationMetadata) {
//配置spring.boot.enableautoconfiguration=false的时候不导入任何bean
if (!isEnabled(annotationMetadata)) {
return NO_IMPORTS;
}
try {
AutoConfigurationMetadata autoConfigurationMetadata = AutoConfigurationMetadataLoader
.loadMetadata(this.beanClassLoader);
AnnotationAttributes attributes = getAttributes(annotationMetadata);
List<String> configurations = getCandidateConfigurations(annotationMetadata,
attributes);
configurations = removeDuplicates(configurations);
configurations = sort(configurations, autoConfigurationMetadata);
Set<String> exclusions = getExclusions(annotationMetadata, attributes);
checkExcludedClasses(configurations, exclusions);
configurations.removeAll(exclusions);
configurations = filter(configurations, autoConfigurationMetadata);
fireAutoConfigurationImportEvents(configurations, exclusions);
return configurations.toArray(new String[configurations.size()]);
}
catch (IOException ex) {
throw new IllegalStateException(ex);
}
}以上这部分代码就是自动配置的核心了,下面对以上的代码进行逐步分析:
AutoConfigurationMetadata autoConfigurationMetadata = AutoConfigurationMetadataLoader .loadMetadata(this.beanClassLoader);这里读取了 META-INF/spring-autoconfigure-metadata.properties 配置文件,这个配置文件中配置了 SpringBoot 自动集成的各种 Enable 框架的执行条件,比如定义与其他 AutoConfiguration 框架的执行顺序,
需要哪些 Bean 在的时候才可以执行等。这里的功能就等价于 @AutoConfigureAfter @AutoConfigureBefore 注解的功能。
下面截取部分配置,感兴趣的可以到 spring-boot-autoconfig- 版本号 /META-INF/spring-autoconfigure-metadata.properties 文件中查看
这里读取 META-INF/spring.factories 配置文件中对应 key:org.springframework.boot.autoconfigure.EnableAutoConfiguration 所对应的类。
源码如下:1
2
3
4
5
6
7
8
9protected List<String> getCandidateConfigurations(AnnotationMetadata metadata,
AnnotationAttributes attributes) {
List<String> configurations = SpringFactoriesLoader.loadFactoryNames(
getSpringFactoriesLoaderFactoryClass(), getBeanClassLoader());
Assert.notEmpty(configurations,
"No auto configuration classes found in META-INF/spring.factories. If you "
+ "are using a custom packaging, make sure that file is correct.");
return configurations;
}SpringFactoriesLoader.loadFactoryNames 方法中主要是加载 META-INF/spring.factories 文件,并且获取 key 为 EnableAutoConfiguration 类全名对应的属性值。感兴趣的可以继续跟入看看源码。
AnnotationAttributes attributes = getAttributes(annotationMetadata);
这里读取 @EnableAutoConfiguration 注解中配置的 exclude,excludeName 两个属性值。configurations = removeDuplicates(configurations);
去除重复的引用,这里实现相当的简单,先将 list 转换有序的 set 对象,这样的话重复的类就被自动剔除了,然后再将 set 转换成 list。configurations = sort(configurations, autoConfigurationMetadata);
顾名思义,这里是对所有的自动配置 Bean 进行排序,使用的规则就是在上面获取到的配置文件的 autoConfigurationMetadata。sort 的实现为:
1
2
3
4
5
6private List<String> sort(List<String> configurations,
AutoConfigurationMetadata autoConfigurationMetadata) throws IOException {
configurations = new AutoConfigurationSorter(getMetadataReaderFactory(),
autoConfigurationMetadata).getInPriorityOrder(configurations);
return configurations;
}实际的排序功能是在 getInPriorityOrder 中:
1
2
3
4
5
6
7
8
9
10
11
12
13
14
15
16
17
18
19
20
21public List<String> getInPriorityOrder(Collection<String> classNames) {
final AutoConfigurationClasses classes = new AutoConfigurationClasses(
this.metadataReaderFactory, this.autoConfigurationMetadata, classNames);
List<String> orderedClassNames = new ArrayList<String>(classNames);
// Initially sort alphabetically
Collections.sort(orderedClassNames);
// Then sort by order
Collections.sort(orderedClassNames, new Comparator<String>() {
@Override
public int compare(String o1, String o2) {
int i1 = classes.get(o1).getOrder();
int i2 = classes.get(o2).getOrder();
return (i1 < i2) ? -1 : (i1 > i2) ? 1 : 0;
}
});
// Then respect @AutoConfigureBefore @AutoConfigureAfter
orderedClassNames = sortByAnnotation(classes, orderedClassNames);
return orderedClassNames;
}这里的实现还是比较清晰的,先通过类名自然排序,然后根据 Bean 配置的 Order 排序 (@AutoConfigureOrder 或在配置文件中指定),最后根据 @AutoConfigureBefore @AutoConfigureAfter 注解中配置(配置文件中指定)的顺序关系进行排序。通过以上步骤,就将所有 AutoConfiguration 的顺序指定 ok 了。
Set exclusions = getExclusions(annotationMetadata, attributes);
获取 EnableAutoConfiguration 注解中配置的 exclude,excludeName 与配置中配置的 spring.autoconfigure.exclude 对应的类。checkExcludedClasses(configurations, exclusions); configurations.removeAll(exclusions);
先对之前步骤获取到的需要剔除的类进行是否存在校验,如果在所有的 AutoConfiguration(configurations)中都不包含配置的类的话,那么说明配置有问题,直接抛出异常。如果都存在的话,那么从 configurations 去除需要排除的类。configurations = filter(configurations, autoConfigurationMetadata);
进行数据过滤。这里会获取系统中所有的 AutoConfigurationImportFilter 对象,通过循环调用 AutoConfigurationImportFilter.match 方法筛选出不符合条件的 AutoConfiguration 类。这样流程过后剩下的 AutoConfiguration 类就是符合我们系统的要求了。fireAutoConfigurationImportEvents(configurations, exclusions);
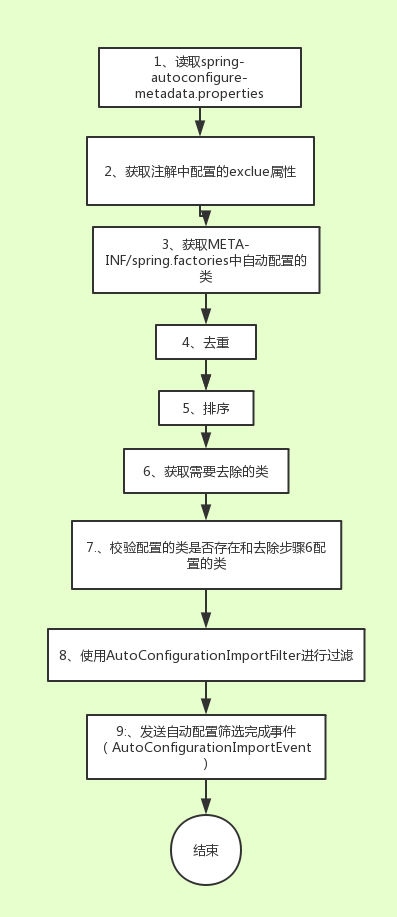
发送自动配置筛选完成事件(AutoConfigurationImportEvent),将筛选后的结果通知对应的(实现了 AutoConfigurationImportListener)的监听者,进行对应的操作。通过以上步骤后,就筛选出了符合需要的自动配置的类。针对以上步骤整理出的流程图如下:

总结
- @EnableAutoConfiguration 会自动将工程中 META-INF/spring.factories 配置文件中 key 为 org.springframework.boot.autoconfigure.EnableAutoConfiguration 对应的所有类进行自动导入。
这也就是为什么 @EnableAutoConfiguration 是 SpringBoot 项目的标配注解了,如果没有导入这个注解所实现的功能,那么所有的自动配置功能将无法使用,也就失去了 SpringBoot 的方便性了。
如果需要配置自动配置类的加载顺序,可以在 META-INF/spring-autoconfigure-metadata.properties 进行配置。这里就可以解释为什么有的框架直接引入对应的 jar 就可以自动运行的原因(如 Web)。
实战
有两个自动配置类 TestConfiguration,TestConfiguration2 代码基本一样。只在构造方法中打印出实例化后的类名和 init 信息,如下:
1
2
3
4
5
6public class TestConfiguration {
private static Logger log = LoggerFactory.getLogger(TestConfiguration.class);
public TestConfiguration() {
log.info("=========>TestConfiguration init!!!");
}然后将这两个类配置到工程中的 META-INF/spring.factories 文件中:
1
2
org.springframework.boot.autoconfigure.EnableAutoConfiguration=\
com.cml.chat.lesson.lesson5.TestConfiguration,com.cml.chat.lesson.lesson5.TestConfiguration2默认 Bean 的加载是按照类名的自然排序进行的,项目启动后输入的 log 为:
1
2
com.cml.chat.lesson.lesson5.TestConfiguration - =========>TestConfiguration init!!!
com.cml.chat.lesson.lesson5.TestConfiguration2 - =========>TestConfiguration2 init!!!此时如果想要 TestConfiguration2 优先于 TestConfiguration 执行,比如 TestConfiguration 需要依赖 TestConfiguration2 做的操作。
那么这时候就可以在 META-INF/spring-autoconfigure-metadata.properties 添加配置:1
2
3
4#order config
com.cml.chat.lesson.lesson5.TestConfiguration=
com.cml.chat.lesson.lesson5.TestConfiguration2=
com.cml.chat.lesson.lesson5.TestConfiguration.AutoConfigureAfter=com.cml.chat.lesson.lesson5.TestConfiguration2项目启动后输入 log:
1
2
com.cml.chat.lesson.lesson5.TestConfiguration2 - =========>TestConfiguration2 init!!!
com.cml.chat.lesson.lesson5.TestConfiguration - =========>TestConfiguration init!!!TestConfiguration 在 TestConfiguration2 初始化之后了,这里可以完成注解对应的顺序功能和条件限制功能。
